Astrophotos often appear soft. The fine details within nebulae and galaxies are often obscured due to the lack of sharpness in the image. PixInsight includes multiples processes that can improve the sharpness in an image.Sharpening an image enhances the overall look of the object. It brings out details. A few of the processes within PixInsight go about sharpening in different ways. The following shows how to combine unsharp mask and multiscale linear transfer to further sharpen astrophotos.
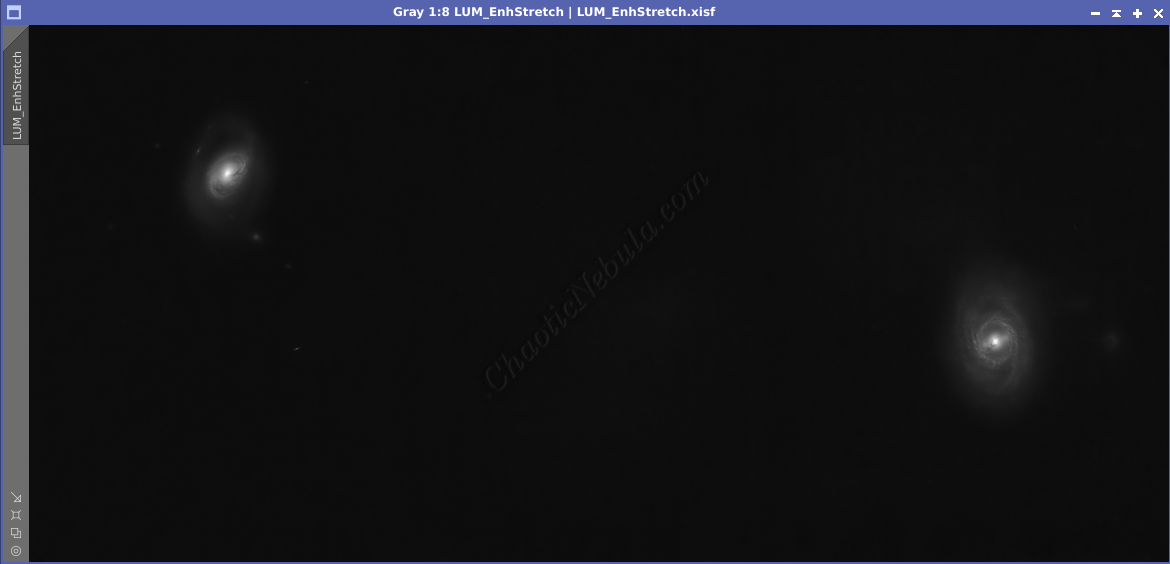
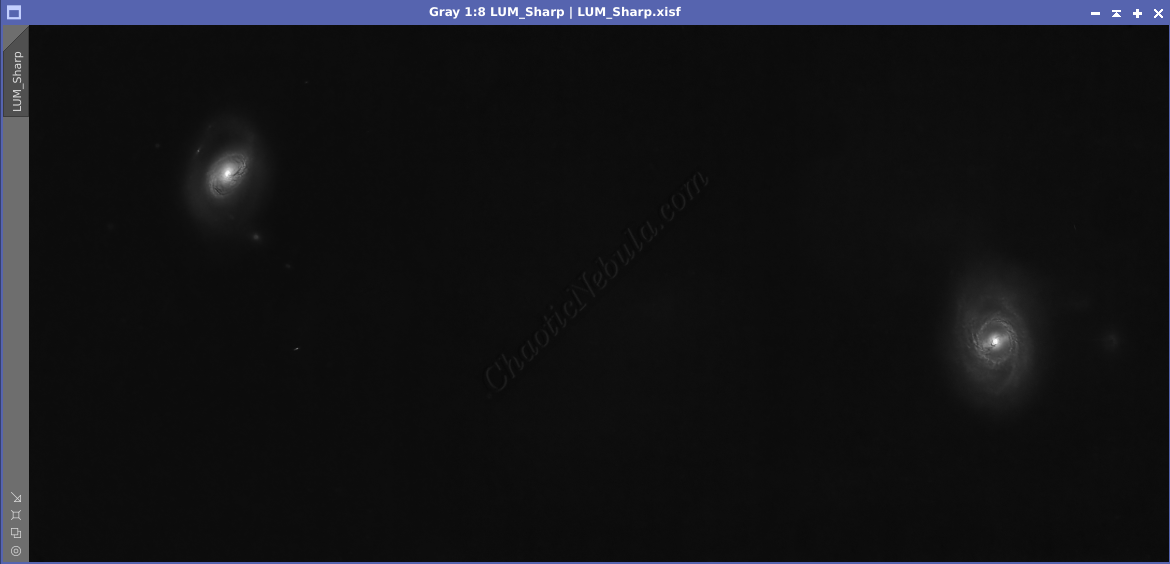
Take a look at the before and after of the sharpening process:
Within PixInsight, the following two processes are used to improve the sharpness and then the results are blended together to achieve the final image.
Sharpening:
Mask Creation
To improve the sharpness of an astrophoto, the goal is to focus the sharpening process on only the brighter areas of the image. Including darker areas will often increase noise and pixelation because the isn’t enough signal available.
To create the sharpening mask, create a clone of the luminance image and start the Histogram Transformation process (Process – Intensity Transformation – Histogram Transformation).
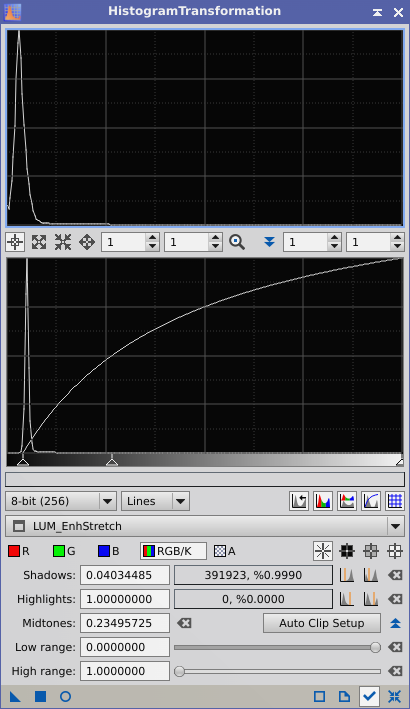
To configure the sharpening mask, do the following to the cloned luminance channel:
- Auto Clip Shadows 1%: This button removes the darkest areas of the image, which the process should avoid processing
- Mid-tones: Adjust the mid-tone slider (middle) to the left to stretch the image, which will also brighten the brighter areas. The bright areas are what will respond the most to the sharpening processes. There is no exact value for the mid-tones. The goal is to have the mask to only incorporate the brightest, most detailed areas of the image.
The second part for creating a sharpening mask is to blur the pixels. A sharpening mask with clear-cut edges can create halos around sharpened areas. By blurring the mask slightly, the transition between sharpened and unsharpened areas becomes smoother, resulting in a more natural look
To blur the mask, use Multiscale linear transform (Process – Multiscale Processing – Multiscale Linear Transform).
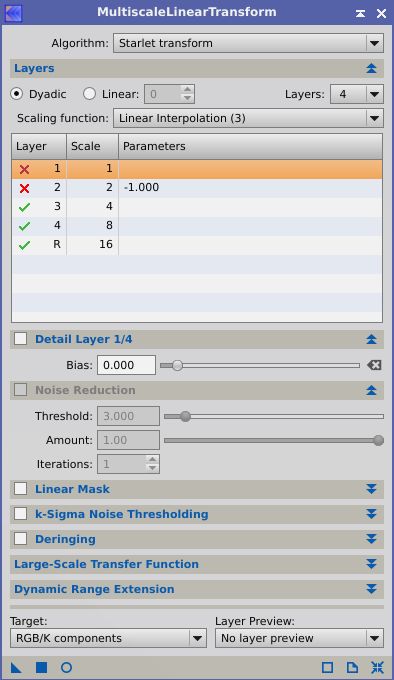
To configure the sharpening mask, do the following:
- Preview: Create a preview window on a bright area of the mask
- Real-Time Preview: Enable
- Layer 1: Disable the layer
- Layer 2: Reduce layer 2 Bias to -1.0
Watch how the pixels within the image start to blur.


Usually, adjustments to the first two layers is enough for the sharpening mask. The blur only needs to be minimal for it to work.
Sharpening 1:
Unsharp Mask
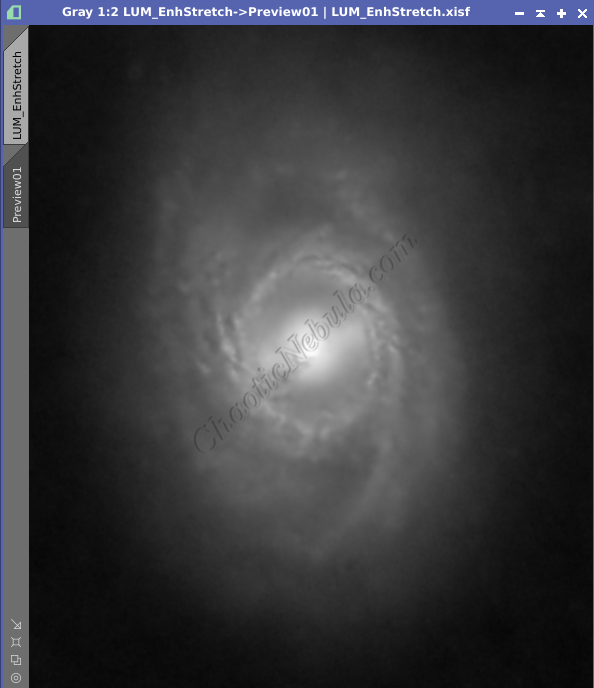
PixInsight’s Unsharp Mask is a sharpening tool designed to enhance the crispness of astrophotography images. It can reveal finer structures and textures in nebulae and other celestial objects.
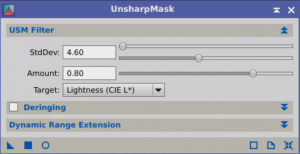
A few things to note about the Unsharp Mask process (Process – Convolution – Unsharp Mask)
- Clone: Create a clone of the baseline luminance image (labeling it as USM) and apply the sharpening mask so that it protects the background (highlighted in red).
- Real-time Preview: Enable the real-time preview within the process to see live results of the changes. (It might be useful to create a small preview window of the high signal areas to better see the changes)
- StdDev: The standard deviation determines the size of the details that will be affected by the process. Increasing the value sharpens larger scale details within the image. Choosing the appropriate standard deviation value involves a balance between preserving the natural appearance of the image and enhancing its sharpness.
- Amount: Controls the strength of the sharpening effect. Higher values equals stronger sharpening. The amount can be left fairly high at 0.8 as the result of this process gets blended to create the final sharpened image.

After applying Unsharp Mask, the galaxies appear more crisp than before.
Sharpening 2:
Multiscale Linear Transform
Unlike PixInsight’s Unsharp Mask, Multiscale Linear Transform takes a different approach to sharpening astrophotos.
- Unsharp Mask: Focuses on enhancing edges by identifying and sharpening image contrasts. This can be great for sharpening stars and bringing out details in nebulae.
- Multiscale Linear Transform: Works on a more sophisticated level. It analyzes the image at various scales, from large-scale features like nebulae to minute details like faint structures within them. By selectively manipulating these different scales, Multiscale Linear Transform can recover details in highlights (bright areas) without affecting unrelated parts of the image.

A few things to note about the Multiscale Linear Transform process (Process – Multiscale Processing – Multiscale Linear Transform)
- Clone: Create a clone of the baseline luminance image (labeling it as MLT) and apply the sharpening mask so that it protects the background (highlighted in red).
- Real-time Preview: Enable the real-time preview within the process to see live results of the changes. (It might be useful to create a small preview window of the high signal areas to better see the changes)
- Layers: They are based on a square of pixels. Lower number layers focus on smaller structures. Layer 1 should be skipped for sharpening as this is often creates pixel-level noise. The higher layers requires smaller levels of sharpening (Detail Layer Bias amounts) before they start introducing artifacts.
- Layer 1: 1 pixel
- Layer 2: 4 pixels (2 x 2)
- Layer 3: 9 pixels (3 x 3)
- Layer 4: 16 pixels (4 x 4)
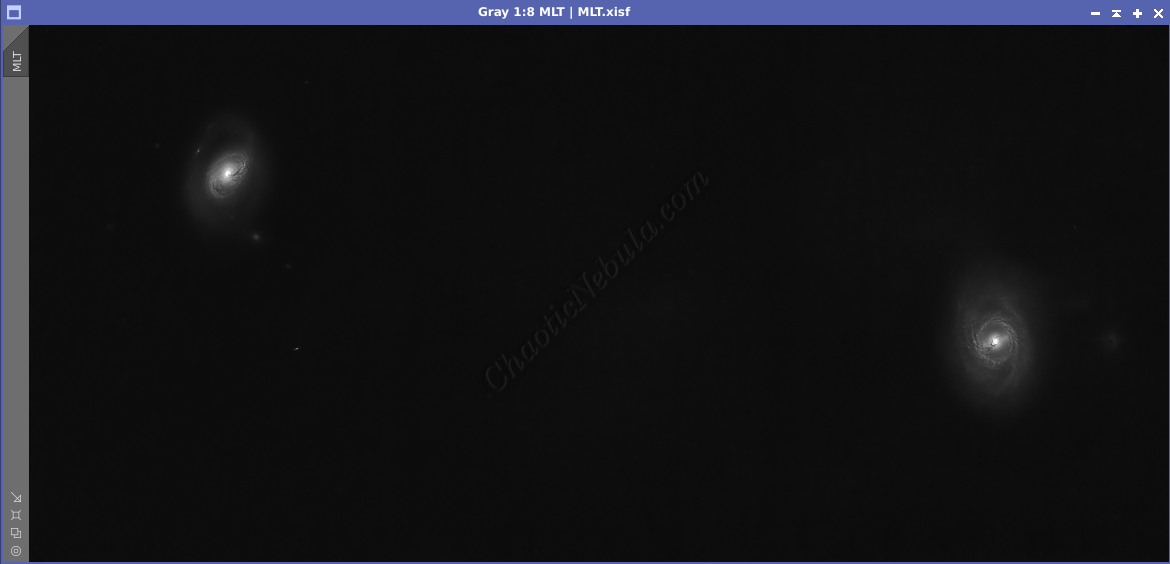
After applying Multiscale Linear Transform, the galaxies appear more crisp than before.
Blending
As the sharpening process perform things differently, it is beneficial to use both methods and blend the result into a final sharpened image. This is done with Pixel Math (Process – Pixel Math – Pixel Math)
In the Pixel Math process, select Create new image and use the following formula. (Adjust the percentages as needed)
(LUM*.3)+(USM*.35)+(MLT*.35)
- LUM: Original Luminance image
- LUM_USM: Unsharp Mask luminance image
- LUM_MLT: Multiscale Linear Transform luminance image
Once applied, all three images get integrated into a single enhanced luminance image.
What’s Next
Save this file as the new Luminance image and continue on with the luminance workflow.