When photographing the night sky, especially with long exposures, various optical issues can arise, such as uneven illumination across the frame or vignetting, where the corners appear darker than the center. Additionally, dust particles on camera sensors can create noticeable artifacts in the final image. Flat frames are able to correct for these issues during the image processing workflow.
Flat frames serve as reference images used to correct imperfections caused by optical distortions, vignetting, and dust particles on camera sensors or lenses. These frames work by capturing multiple images of a uniformly illuminated source, such as a bright white screen or an evenly lit sky during twilight. This makes it possible to obtain reference images that represent the optical flaws present in their setup.
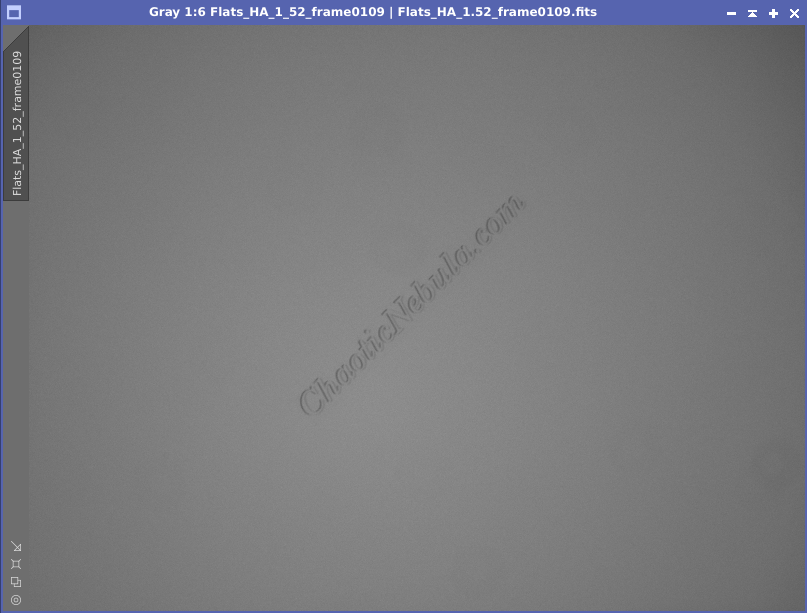
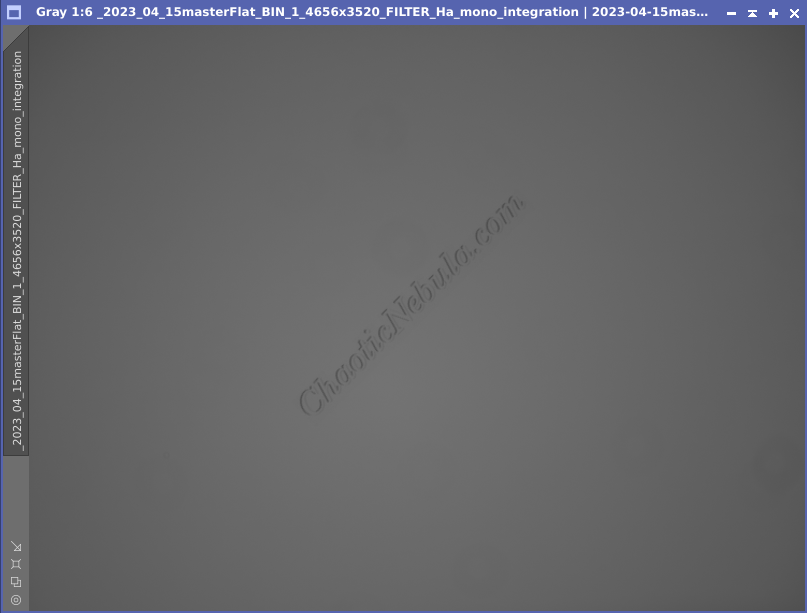
This single flat frame image shows 3 things:
- Vignetting: There is a slight darkening around the corners than the rest of the image
- Dust: There are multiple, faint doughnut holes through the image
- Noise: The image is grainy
A master flat frame is used to correct the original images. By dividing the astrophotography images by the corresponding flat frames, imperfections such as uneven illumination and dust spots are effectively removed, resulting in a cleaner and more accurate representation of the object.
Flat frames are one of the most critical types of calibration frames (Bias, Dark, Flat, Dark Flat) to use for astrophotography because:
- Correcting Imperfections: By applying flat frames to an astrophoto, issues like uneven illumination and dust spots are effectively mitigated, resulting in cleaner and more accurate final images.
- Enhancing Image Quality: By using flat frames to correct these imperfections, astrophotographers can enhance the overall image quality, producing more visually appealing and accurate representations of celestial objects and phenomena.
Capturing
Flat Frames
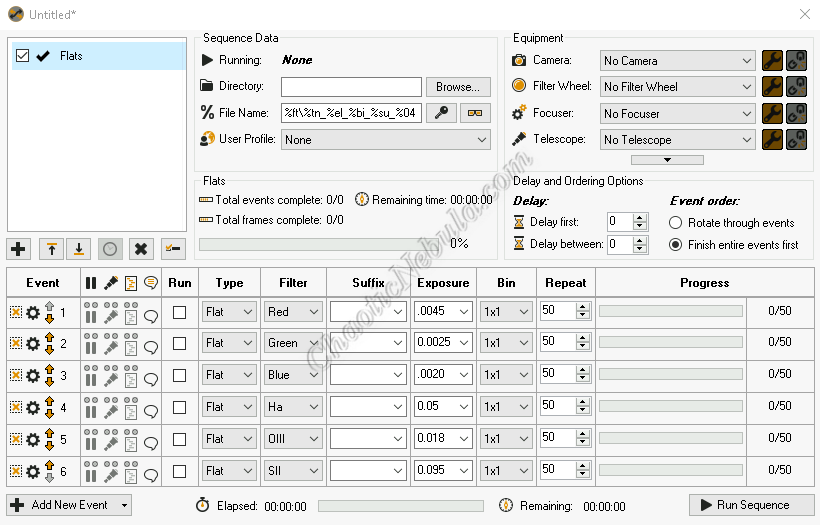
Capturing flat frames requires an even illumination across the entire field of view. One of the easiest ways to do this is to use the sky. N.I.N.A. includes an automated way to create sky flats within the sequencer. Learn how with the following best practice guide.
Although a clear twilight sky is the easiest, it might not be possible. An alternative approach is place an LED tracing tablet on top of the telescope. This approach is evenly lit and repeatable, making it a long-term solution.
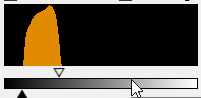
Flat frames are required for each optical configuration. Flat frames are required for every combination of sensor temperature, binning, gain, offset, and filters being used. And the flat frame exposure time must be applied correctly to avoid having under or overexposed flat frame images. The histogram of a properly exposed flat frame has the peak appearing on the left third of the graph.
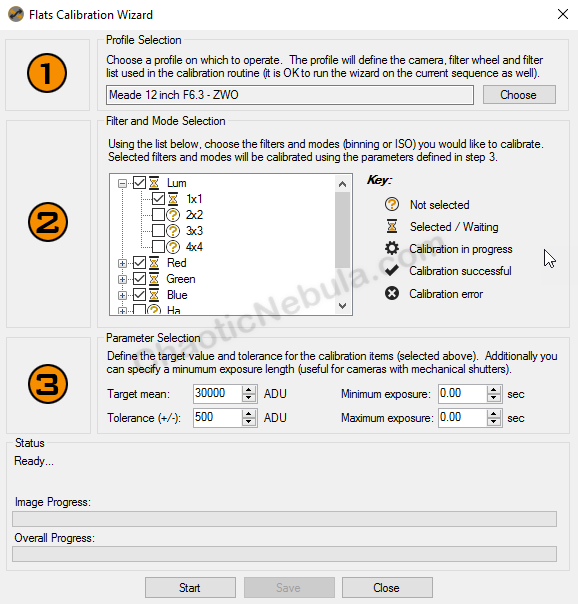
Tools like Sequence Generator Pro and N.I.N.A have a flat calibration wizard to help identify the proper exposure time for each filter.
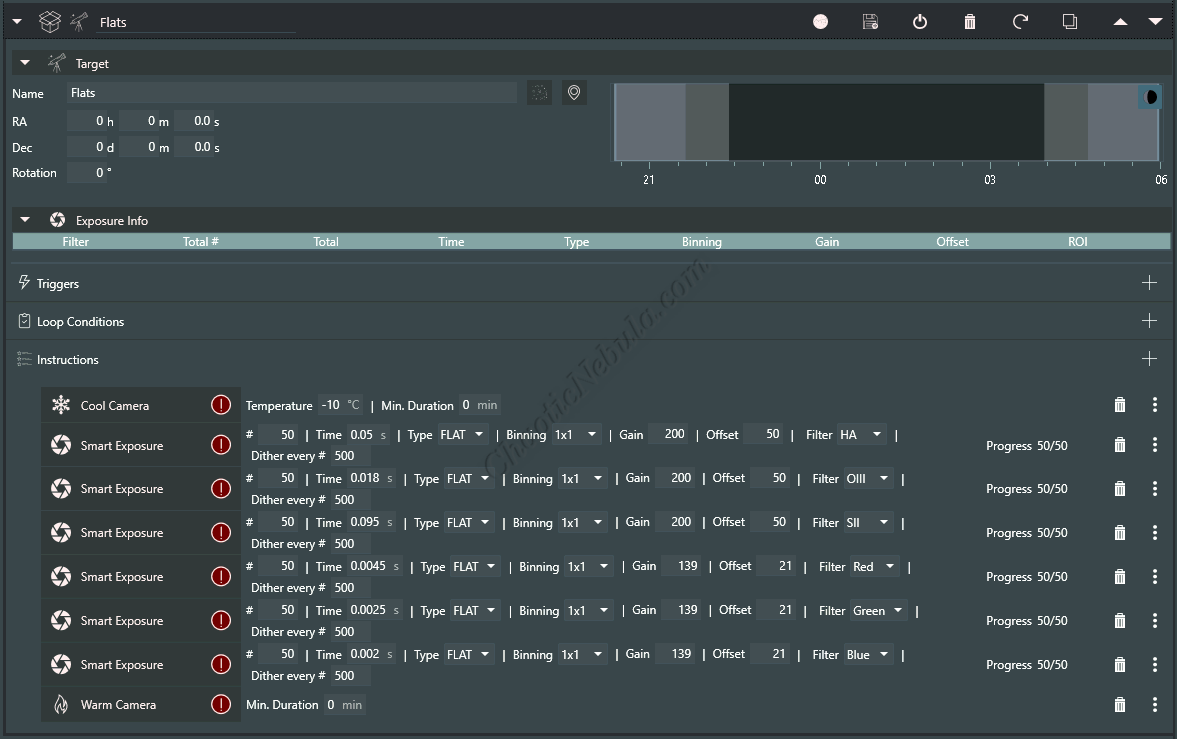
To reap the benefits of flat frames, capture several (typically 25-50) flat frame images with the same filter, gain, offset, binning, and camera temperate (if possible).
For example, when capturing narrowband images (hydrogen-alpha, oxygen-III, and sulfur-II) during the summer months, three sets of flat frames are captured. And when capturing broadband images (red, green, and blue), three additional sets of dark frames are captured
| Type | Duration | Binning | Gain | Offset | Temp |
| Hydrogen-Alpha | 0.05 seconds | 1×1 | 200 | 50 | -10C |
| Oxygen-III | 0.018 seconds | 1×1 | 200 | 50 | -10C |
| Sulfur-II | 0.095 seconds | 1×1 | 200 | 50 | -10C |
| Red | 0.0045 seconds | 1×1 | 139 | 21 | -10C |
| Green | 0.0025 seconds | 1×1 | 139 | 21 | -10C |
| Blue | 0.002 seconds | 1×1 | 139 | 21 | -10C |
During winter months, the same series is reused except the sensor temperature is reduced to -30C.
All of these parameters can easily be setup in astrophotography image capturing tools like N.I.N.A. and Sequence Generator Pro.
Calibrating
Flat Frames
Before creating a master flat frame for each filter, the individual frames must be calibrated. There are two different approaches when it comes to calibrating flat frames.
- Bias Calibration: Bias frames capture the electronic noise of the camera. This approach is the easiest because the bias frame can work for any filter sharing the same sensor temperature, gain, and offset.
- Dark Flat Calibration: Dark flats are dark frames (images where no light is captured) where the exposure time is equal to the exposure time of the flats. This approach captures the electronic noise of the camera as well as the thermal (heat) noise from the image. Dark flats are more time consuming because dark flats must have the same exposure time as the corresponding flats. This often means one dark flat per filter, sensor temperature, gain, and offset.
When calibrating flat frames, only choose one method.
Within PixInsight, this entire process can be automated by using the Weighted Batch Preprocessing Script or done manually. Details on the automated approach are found in the following guide.
For the manual process, the individual flat frames can be calibrated with the PixInsight Image Calibration process (Process – Image Calibration – Image Calibration).
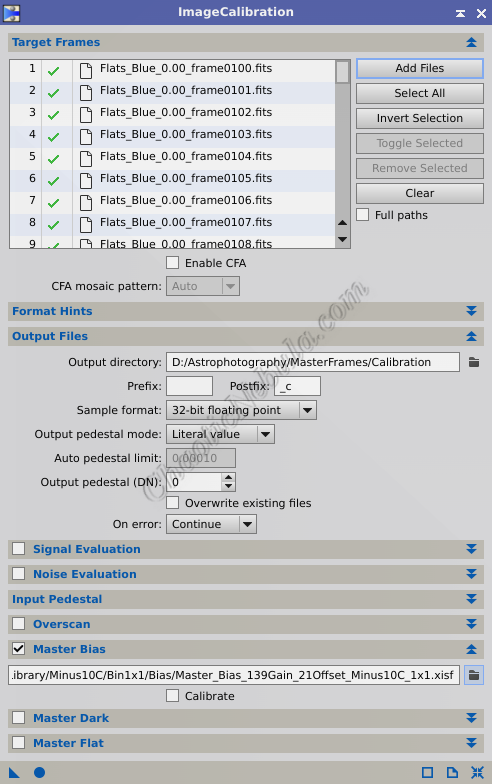
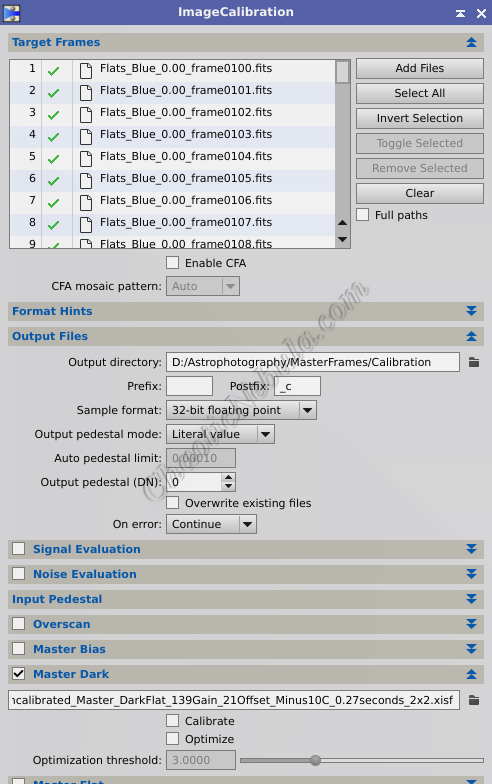
- Target Frames: Select the flat frames for the respective filter
- Output Files: Select a directory to store the calibrated files
- Master Bias: If using the Bias calibration option, select the master bias file. The Master Bias must have the same sensor temperature, gain, and offset as the flats
- Master Dark Flat: If using the Master Dark calibration option, select the master dark file. The Master Dark Flats must have the same sensor temperature, exposure time, gain, and offset as the flats
Processing
Flat Frames
Once the 25-50 flat frames have been calibrated with either a bias or dark flat, they need to get integrated into a single master flat image. Within PixInsight, this can be automated by using the Weighted Batch Preprocessing Script or manually. Details on the automated approach are found in the following guide.
For manual integration, the PixInsight Image Integration process (Process – Image Integration – Image Integration) is used.
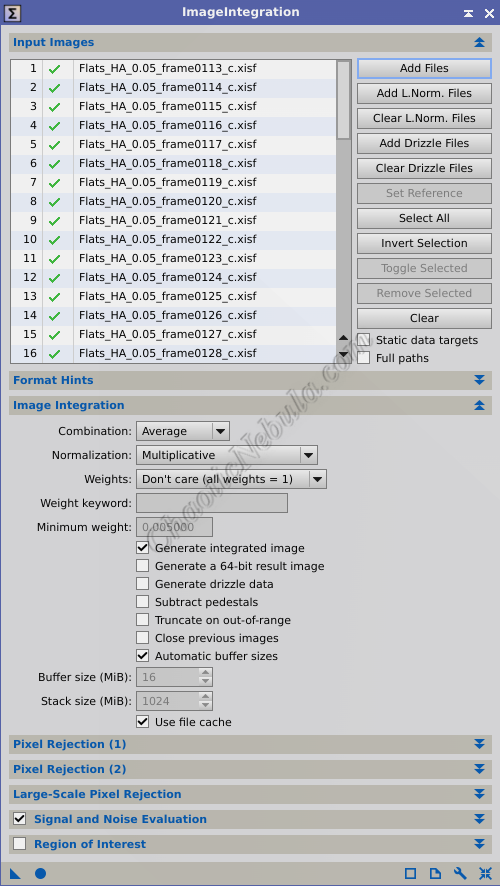
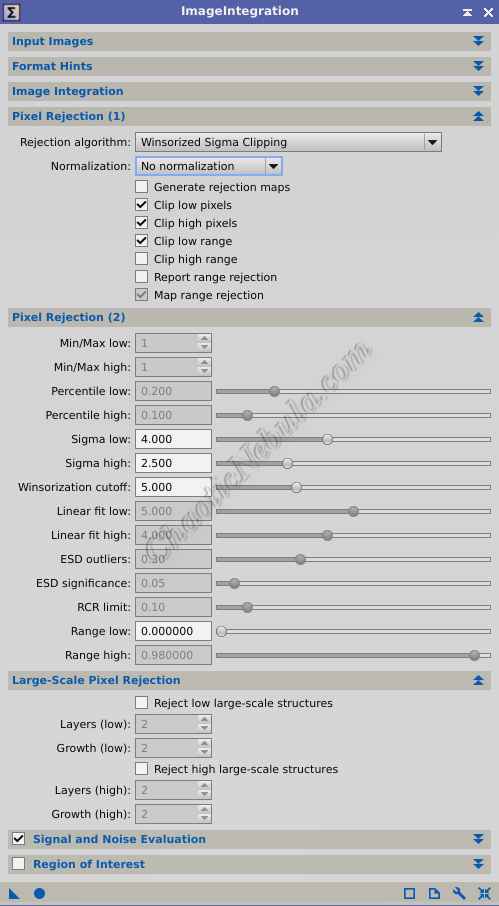
The settings to use to create a master flat frame are as follows:
- Image Integration
- Combination: Average. Averaging multiple flat frames helps to smooth out random noise present in each individual frame.
- Normalization: Multiplicative. This ensures all flat frames have a consistent overall intensity level before integration. This is crucial because if some flats are brighter or dimmer than others, their contribution to the master flat would be unbalanced. PixInsight adjusts the intensity of each flat frame by a constant factor. This factor scales the entire image proportionally, ensuring all pixel values in the flat frame contribute equally to the final master flat.
- Weights: Don’t care (all weights = 1). By treating each frame equally, the final master flat frame is less susceptible to the influence of outliers or anomalies present in individual frames
- Generate integrated image: Enabled
- Pixel Rejection (1)
- Rejection Algorithm: Winsorized Sigma Clipping. It is the optimal rejection algorithm for large sets of images.
- Normalization: No normalization. This method preserves the original pixel intensity, helping to ensure the master flat accurately reflects the illumination pattern.
- Clip low pixels: Enabled. Helps mitigate the influence of extreme values in the darker pixels.
- Clip high pixels: Enabled. Helps mitigate the influence of extreme values in the brighter pixels.
- Sigma low: 4.00. Any pixel value more than 4 standard deviations below the mean will be considered outliers and potentially clipped
- Sigma high: 3.00. Any pixel value more than 3 standard deviations above the mean will be considered outliers and potentially clipped
- Winsorized cutoff: 5.00. Establishes percent limits on how many pixels can be cut at the low and high end. A cutoff of 5% would indicate that the lowest and highest 5% of values in the dataset will be replaced with values at the 5th and 95th percentiles, respectively.
This process creates a master dark frame.
When this gets applied, each light frame has the flat frame corrected
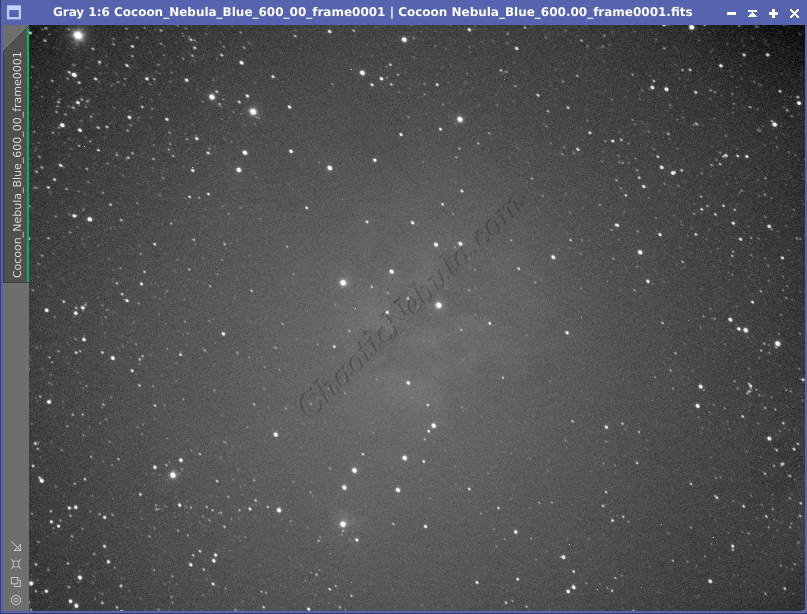
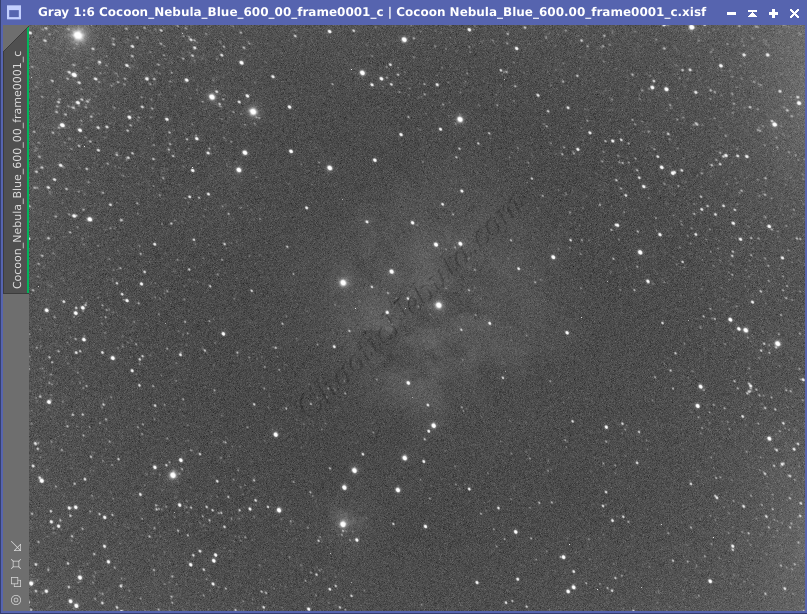
From the example, the edges are adjusted brighter, the dust doughnut in the lower-right corner has been removed, and the brightness in the center has been removed, making it easier to see the object.
What’s Next
With a master bias calibration frame created, image processing can continue based on the respective workflow: